The Kitchen Witch Blog: The recipes and ramblings of a biker chick
HomeThe Kitchen Witch Blog: The recipes and ramblings of a biker chickRecipesRamblingsRhondaShopContact UsRecipes
The Kitchen Witch Blog: The recipes and ramblings of a biker chick
  • Perfect Prime Rib Instructions

    December 31, 2010 by Giggles

    DSC_0033

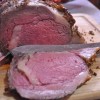
    Tired of Turkey and Ham?  Didn’t get a chance to indulge yourself at Christmas?  Start the New Year right with a Prime Rib Roast.  I’m talking about the king of roasts here.  The beauty of a prime rib roast is how easy it is to make.  The only way you are going to mess up this roast is by over cooking it.  The beauty of having such a fine cut of meat to start with means that you don’t need to do much in the flavor department.  The real secret to a prime rib roast is the method by which you cook it.  I don’t even have a recipe, just follow the simple instructions and I guarantee a perfect prime rib roast.

    You need at least a 2 rib roast to do this, I cooked a 3 rib roast because I am Mrs. Greedy.  I start by heavily salting the meat all over (except the top fatty part), I recommend Kosher salt.  I use a steak seasoning to create a crust on the top.  You can do this up to 4 days in advance, at minimum for 24 hours.  I don’t know all the scientificiness behind what the salt does to the meat, I just know it makes a BIG difference.

    DSC_0026

    Before I roast the prime rib, I cut the meat away from the bone and then tie it back on. Removing the meat from the bone and tying it back on accomplishes two things, the ribs make a natural rack and the meat comes off easily, making it a snap to carve.  I place it in a roasting pan or in cast iron skillet (remember it has it’s own rack). I’ve had my best success (trust me I’ve been doing this every year for about 15 years) cooking it low and slow. I roast it in a 200 oven, about 30 to 45 per pound.  Typically I use a meat thermometer to determine doneness, when it’s 125 – 130, it a perfect medium rare.

    DSC_0029

    I remove the roast and tent it with foil, then blast the oven to as high as it will go (550).  In about 20 minutes, the roast has rested, the oven is hot and I place the roast (without the foil tent) back into the oven to get a nice browned outside….perfection!

    DSC_0031

    Once I remove the roast to a carving board (a.k.a. my cutting board), I put my pan on the stove top and turn it on medium high heat.  Add some beef broth or wine to deglaze the pan and viola, an Au Jus.  I’m very traditional when I serve prime rib, a small cup of Au Jus and some horseradish and I am delirious.

    A perfect meal for McGyver and me (Thanks, Kimmers, for wine! Thanks, Mom, for the gorgeous center piece)

    DSC_0034

    See the perfection, taste the perfection!

    DSC_0036

    What you don’t see is that I ate a giant baked potato, got so full on potato and wine that I couldn’t finish my Prime Rib, so much for being Mrs. Greedy.

    DSC_0039

    We ended up with plenty of leftovers.  I see future posts coming up.


  • Smoked Turkey Navy Bean Soup

    December 28, 2010 by Giggles

    Baby it’s cold out there…

    Smoked Turkey Navy Bean soupDSC_0013

    A hot bowl of soup is just the thing to warm you up.

    Smoked Turkey Navy Bean soup (10)

    Navy bean soup is in my all time top three favorite soups.  Normally I cook it with a smoked ham hock or the leftover ham bone.  I had some smoked turkey I needed to use up, so I used it instead.  I was pleasantly surprised on how good this tasted.  The smokiness really came through, honestly, if I didn’t cook it myself I would have thought it was ham.

    Smoked Turkey Navy Bean soup (5)Smoked Turkey Navy Bean soup (4)

    Just look at all that succulent smoked turkey.

    Smoked Turkey Navy Bean soup (7)

    Tender white beans.

    Smoked Turkey Navy Bean soup (6)

    Smoky salty broth.

    Smoked Turkey Navy Bean soup (8)

    Warm yourself up with a bowl of this soup, I know you want some!

    Recipe

    Ingredients

    • 2 cups dried beans
    • 1 tbs. oil
    • 1 cup diced onion
    • 1/2 cup diced celery
    • 1 cup diced carrots
    • 2 smoked turkey wings ( Smoked ham hock, Ham bone or leftover smoked turkey if you have some)
    • Salt and Pepper to taste

    Directions

    Carefully sort through your beans and look for any stones.  The night before soak your beans in a big pot of water.  Next day, drain off the water.  In a large Dutch oven heat the one tbsp. oil and sauté the onions, carrots and celery until the onions become translucent.  Add the beans and enough water to cover the beans by a 1/2 inch.  Add the smoked turkey wings.  Bring to a boil then turn down to a simmer.  Cook the beans for 2 to 4 hours.  Remove the wings and let cool enough to handle.  Once the wings are cool enough to handle, pick the meat off and chop into bite size pieces.  Add the turkey back to the beans.  Salt and pepper to taste.

    You can also cook the soup in a crock pot for 6-8 hours over low heat.


  • The Family Tree

    December 25, 2010 by Giggles

    Once upon a time, long, long ago, I dreamed of  of a tree where everything matched.  A tree that people would look at at and ooh and ahhh.  A tree that matched.  You know the kind of tree you see in the department store, so beautiful and magnificent, the kind that take your breath away.  A tree that Martha Stewart would be proud of.  I did that one year.  I bought all the matchy, matchy Christmas tree decorations that my heart desired.  Giant balls, garland and ribbons galore.  I decorated our tree and it looked beautiful.  It could have been featured in any magazine.  Only I ran into one small problem.  My family hated it.  “That’s not our tree!”  Where are my porcelain ballet slippers?  Where is the ornament I made in 2nd grade?  Where is our family tree?

    I was so proud of my perfect tree, yet my family rebelled.  I conceded and took down my beautiful decorations, my perfect bows and matching garland and hung up our mismatched ornaments.  What I failed to realize was that a beautiful tree to my family was the tree full of memories.  That each and every ornament that hung on it, had a story attached to it. It didn’t matter if our tree couldn’t be featured in a magazine or found in the department store, Christmas was about family and family history.  And of all things Christmas, the ornaments represented  family.

    We have ornaments from our favorite Christmas stories.

    DSC_0029

    The ornaments that McGyver and I picked out together (affectionately known as the onion ornaments).

    DSC_0032

    Ornaments with the name and year so that we will never forget.

    DSC_0037

    Macaroni ornaments that remind us of homemade ingenuity.

    DSC_0039

    Ornaments form our travels like this Marino glass from Italy.

    DSC_0043

    And from Delft, Holland.

    DSC_0045

    Can’t forget England.

    DSC_0053

    Wooden ornaments from the land of Christmas, Germany.

    DSC_0058

    And more beautiful ornaments from Germany like this bird.

    DSC_0052

    Career related ornaments (past career in this case).

    DSC_0051

    I couldn’t forget the ornaments adorned with our children’s pictures.  An elementary art project that every child does.

    DSC_0047

    Ornaments that depict what we love, like our puppy dogs.

    DSC_0050

    And when our children have grown, ornaments with pictures of our grandchildren.

    DSC_0056

    How about a Baby’s first Christmas?

    DSC_0060

    The hand painted ornament from Oma?

    DSC_0063

    A child’s passion…penguins.

    DSC_0065

    Let’s not forget the handmade ornaments from a child.

    DSC_0075

    How about a handmade ornament from the first Christmas you left your parent’s house and you didn’t have enough money to buy your own ornaments so you poorly crocheted all your ornaments and strung popcorn and made a paper angel to top your tree for a memory maker?

    DSC_0080

    Ornaments that reflect your passion.

    DSC_0044

    DSC_0072DSC_0070

    Ornaments that are a private joke.

    DSC_0048

    Then there is trying to adorned your puppy dog with one of your ornaments and getting her to pose for a picture.

    DSC_0003DSC_0006

    DSC_0007DSC_0008

    There are at least 500 more memories hanging on our tree.

    From my family tree to yours,

    DSC_0160

    have a very merry and uniquely family Christmas!


  • Receiving Home Stockings

    December 24, 2010 by Giggles

    I work in a very special place, by virtue my job is all about giving.  I work in a plasma donation center.  People come in, donate plasma and we compensate them for their time. It’s a proverbial we benefit you benefit.  I work in a place where we save lives every day…not directly but we are the first step in making it happen.  The problem with being the first step is that you don’t get to see the results of what you do.  We know that the plasma we collect helps people with immunodeficiency problems and burn victims plus a lot more.  It’s a good feeling, but it’s not quite enough.  Our small center here in Great Falls has made it their personal mission to to be a charitable organization beyond collecting plasma.  Every Friday we allow employees to wear jeans for a small donation of $1.oo and then we donate it to a charity.  We have participated in NeighborhoodWorks laying sod and have donated thousands of pounds of food to the food bank, we’ve even volunteered at the local rescue mission and served food to the homeless, just to name a few of the things that we do.

    Receiveing Home Stockings (2)

    When we started planning our Christmas activities for the staff, we wanted the staff to have fun but we also wanted to give to our local community.  Our very giving center decided to have a stocking decorating competition, then donate filled stockings to our local receiving home.

    Receiveing Home Stockings (3)

    The stuffed stockings were completely funded by the staff.  We ended up decorating 25 dollar store stockings.

    Receiveing Home Stockings (4)

    We filled the stockings with nuts, fruit and toys.  Some of our staff went all out and stuffed their competition stockings with more than what we had planned.

    Receiveing Home Stockings (5)

    There were cute snowman stockings.

    Receiveing Home Stockings (6)

    I loved this one…”Jingle bells ,Batman smells, Robin laid an Egg, Bat mobile lost it wheels (flip stocking over) and the Joker got away.

    Receiveing Home Stockings (8)

    Our winner was from Super J.  She made the stocking with the cars.  No surprise, Super J and her partner have a young boy who is enamored with cars.  Our boss made the Christmas tree stocking and the beautiful blue stocking was made by KA who also did the Batman stocking…she obviously has a sense of humor and a sense of style.

    Receiveing Home Stockings (10)

    Lulu and I did our best.  Lulu made a tree stocking and I went for the Victorian stocking, one I’m sure Mariah Carey would love (hello butterflies).

    Receiveing Home Stockings (11)

    Our staff pulled out all the stops, they were so clever in decorating the stockings.  What a great use of felt!

    Receiveing Home Stockings (12)

    What about a stocking completely covered in pom poms? So fuzzy and fun.  I loved the reversible stocking, it’s pink, it’s blue, it’s for a girl, it’s for a boy or how about twins?

    Receiveing Home Stockings (13)Receiveing Home Stockings (14)

    Summer dog was enjoying the array of stockings, she loved sniffing every single one.

    Receiveing Home Stockings

    Our staff wasn’t the only ones involved.  Our generous tsaff enlisted family members (children and grandchildren), and Billiam got his wife to get some seniors from our local retirement center to make stockings.

    Receiveing Home Stockings (15)

    The stockings were picked up by the Great Falls Receiving Home.  If you don’t know what a receiving home is, it is a home for children who have to leave their current home because it is no longer a good place for them to be.  It is a safe home.  In order to be safe, their location has to be kept secret so they came to my house and picked up the stockings.  It was a great feeling to know the stockings were going to children who were in a bad family situation.  I hope that it brings them a little happiness during this time of difficulty in their lives.

    Isn’t this what Christmas is really about?


  • Cream Cheese Cake Mix Cookies

    December 22, 2010 by Giggles

    Cream Cheese Cake Mix Cookies (2)

    We had our first ever cookie exchange at work.  The deal was: bring two dozen cookies, of the same or different kind, you come home with two dozen cookies that someone else baked.  Since I’m not a big fan of baking (except doing my duty during the holidays and other special occasions), I was excited for the opportunity to get a variety of cookies for minimal effort.  What a deal, plus my family was excited since they were already cookie deprived because I’m a cook and not  a baker.

    I don’t have much patience with baking, all that measuring and mess, but I had vowed to make something unique.  I cooked baked up a batch of cookies that used common and readily available ingredients and made them into something special. I took a basic cookie cream cheese cake mix recipe added some rum flavoring with some chopped macadamia nuts and came out with a big winner!

    This recipe was so easy!  If you need a last minute quick cookie recipe then this is the one.  It was a huge favorite especially with the fans who enjoy a soft cookie.  The cookie  is so soft and moist, it’s almost cake like!  I think the cream cheese gives it depth of flavor and helps with the texture.  Add the rum and macadamia nuts and you start to feel as if you’ve left the cold winter days and landed in the tropics. I modified this recipe.

    It all started with some softened butter and cream cheese blended together.

    Cream Cheese Cake Mix Cookies (3)

    Cream Cheese Cake Mix Cookies (4)

    Then along came the egg and rum flavoring.

    Cream Cheese Cake Mix Cookies (5)

    Add the cake mix.  I used regular yellow cake mix.

    Cream Cheese Cake Mix Cookies (6)

    Then mix in the chopped macadamia nuts (which I purchased already chopped).

    Cream Cheese Cake Mix Cookies (8)

    The dough is quite sticky so add it by the rounded teaspoon into the powdered sugar. Roll it around forming a ball and until it is nicely coated.

    Cream Cheese Cake Mix Cookies (9)

    Place the cookie dough balls onto a parchment lined cookie sheet.

    Cream Cheese Cake Mix Cookies (10)

    Then bake in a 350 oven for 10 – 13 minutes.  Make sure you leave plenty of space because the cookies spread.

    Cream Cheese Cake Mix Cookies (11)

    Once the cookies have cooled, dust them with more powdered sugar.

    Cream Cheese Cake Mix Cookies (12)

    Powdered sugar gives the cookies a snow capped look, perfect for a winter/holiday cookie exchange.  Nice-n-easy, cheesy peasy cookies!

    Recipe

    Ingredients

    • 1 8 oz. package cream cheese, softened
    • 1/2 cup unsalted butter, softened
    • 1 egg
    • 1/4 tsp. rum extract
    • 1 (18, 5 oz.) yellow cake mix
    • 1/2 cup chopped macadamia nuts
    • powdered sugar

    Directions

    Preheat oven to 350. Cream cheese and butter with a mixer.  Add egg and extract, mix well.  Add cake mix, mix until well blended.  Stir in macadamia nuts.  roll into 1: balls and cat in powdered sugar.  Bake on a parchment line cookie sheet for 10-13 minutes.  Cool completely then dust with additional powdered sugar.


  • Basic Bowl of Red

    December 19, 2010 by Giggles

    Over a month ago, when I was teaching my California Roll class, Mark had confessed to me that he didn’t know how to make chili.  I told him perfect, that I had planned on posting my “no” recipe chili that very week.  Me and my big mouth, I should never give a date for anything.  Obviously it didn’t happen, but I do keep my word, even if it’s late.

    Chili (4)

    I can’t say this is a recipe per say.  More of a guideline.  Chili lovers have so many different tastes, from mild to 5 alarm, different types of meats or beans.  Frankly chili is a very individual dish.

    Chili

    People are even associated with their “famous” chili’s because it is so easy to make a chili recipe your own.  Personally I’ve never been know for my “world famous” chili, I haven’t spent years perfecting the ultimate chili recipe.

    I’ve spent years perfect a base chili recipe. A recipe formula, if you will, that gives the basis for all that recipe creativity that everyone has somewhere inside them.

    Chili (3)

    Get the creative juices flowing or just follow the basic formula, wow your friends and family, enter a chili cook-off.

    Experiment and have fun.  Enjoy you own special version of chili, it’s easy!

    Chili (2)

    Recipe

    Basic Ingredients

    • 1 lb meat (ground beef, chicken, turkey, lamb, or sausage any type, or stew meat…)
    • 1 bell pepper, any kind, cleaned and diced
    • 1/2 of an onion, diced
    • 3 cans of beans (chili beans, kidney, pinto, black, navy, garbanzo, whatever)
    • 1 can tomatoes (Rotel, diced, stewed, etc.) or 2 cups fresh
    • 1 small can tomato paste
    • 1 tbsp. cumin
    • 1 to tbsp. chili powder (regular, chipotle, ancho or combination)

    Directions

    In a large dutch oven cook the meat, drain if necessary.  Add the pepper and onion, cook until they are tender.  Add the remaining ingredients and simmer for an hour.

    Some notes: I used venison breakfast sausage, fresh tomatoes (because they had to be used), 1 can chili beans, 1 can kidney beans and 1 can of pinto beans.  I used plain chili powder because the Baby boy likes it mild.

    If you like a spicier chili, use Rotel tomatoes either mild, medium or hot.  The chipotle chili powder will increase the heat factor and the Ancho chili powder will  give it a smoky flavor.  You can add jalapenos or other hot peppers if you are looking for that 5 alarm chili.

    If you use something besides ground meat such a stew meat you will need to adjust your cooking time accordingly.

    Topping suggestions:

    • Cheddar cheese
    • Diced onion
    • Chopped Cilantro
    • Sour Cream
    • Avocados
    • Pickled jalapenos
    • Black olives
    • Whatever else you can think of!


  • Hickies

    by Giggles

    A Hickey is a temporary bruise or mark caused, usually intentionally, by kissing, sucking, or biting the skin forcefully enough to burst blood vessels beneath the skin.

    Hickeys typically last from four to twelve days and may be treated in the same way as other bruises. You can try to get rid of hickey by getting a penny or bottle cap, put water on the hickey, then rub it over the hickey in a circular motion.

    Hickeys can be a purple-like color similar to other types of bruises, or a cluster of red speckles.

    According to common belief [1], it is said that a way to help the hickey heal is to put a block of ice on the affected area, although this will only help if the hickeys are quite new and have only been there for under 10 minutes. They can be covered with foundation, powder or concealer if one wishes to hide them. (source)

    This…my Baby boy……

    Ryan Dec 2010

    Got his first hickey.  He proudly displayed it to me.

    Baby Boy gets a Hickey

    A gargantuan hickey.  What human could have made this?

    BB gets a hickey (2)

    I’m ready to take this girl down!  Who’s her parents, I want their number now!

    Say what?  It wasn’t a girl?  It was the pool cleaner vacuum?

    Your buddy thought it was funny?

    BB gets a hickey (3)

    Boys do stupid things.

    Secretly I’m glad it was a stupid boy thing…then I Googled hickies and there were 1,060 results for “hickies cause cancer”.

    I read them all.

    I think I might tell the Baby boy and any girl he introduces me to, that hickies cause cancer, Muhwhahaha!

    *Just for the record they don’t, but don’t tell him.


  • Sandbakkels

    December 15, 2010 by Giggles

    Sandbakkels (2)

    After living in Europe for over 8 years I learned that when someone asks you where your family is from, you say America.  To say Germany or Iceland or wherever, they take it quite literally.  Totally different from what we mean in the states. America is such a melting pot and very few of us are truly native Americans, so when we ask “where is your family from?”, we mean “what is your heritage?”. Heritage to Americans equals traditions, and the holidays really bring out the traditions in all of us.

    Sandbakkels

    My heritage on my dad side is German, if you were to look at me, you would not disagree.  I’ve turned into a nice stocky frau.  On my mom’s side I’m an amalgam of Scandinavia: Norwegian, Icelandic, Finnish and Swedish.  I grew up with the smell of lutefisk and a whole lot of ya’s.  Around Christmas time my Great Grandma Emma would turn out hundreds of lefse rounds and dozens of Sandbakkels.  I never learned how to make them myself but I remember how excited I was to see them at Christmas time, I never thought I’d have a Christmas without them.  But I did, my great grandmother passed away (well into her 90’s) and with her so did lefse and sandbakkels.

    My mother tried to keep some of the tradition alive by making lutefisk, honestly I wished she’d would have let that one die.  Lutefisk is a white fish that is soaked in lye for days, washed and then boiled.  It’s stinky, gelatinous mass was served under a white sauce that I can only guess was meant to disguise it’s looks and try to make it more palatable.  Oh why didn’t she make the wonderful potato tortillas known as lefse, so I could butter them and spread them with brown sugar and roll them up to eat?  She could have made sandbakkels, the Norwegian version of a short bread cookie, only better because you can fill them with wonderful things like jam, or lemon curd or Nutella?

    No way, my mother chose lutefisk.  As much as I love traditions I decided to put a halt to that tradition and stick with the sweeter side and try my hand at sandbakkels. The ingredient list is short and the dough is easy, but they do require a special tin, called (oddly enough) sandbakkel tins.  The tins traditionally come in four shapes and have fluted edges.  You can purchase them at specialty stores or online.

    Sandbakkels (3)

    I sprayed my tins with Bakers Joy because I was terrified that they would stick and end up in a crumbled mess.  I just knew my Great Grandma was watching me and I didn’t want to disappoint her.

    Sandbakkels (4)

    I was a good little baker and I creamed my butters and sugar first.

    Sandbakkels (5)Sandbakkels (6)

    Continuing to be a good baker and follow the rules (remember GG Emma is watching), I then added the egg, vanilla and salt.

    Sandbakkels (7)Sandbakkels (8)

    Then like a bad food blogger, I didn’t photograph adding the flour one cup at a time and mixing it in.  Thank goodness GG Emma doesn’t care if I’m a good food blogger.

    Next take about 1 1/2 tbsp. dough and press it into the sandbakkel tins.  I place them on a cookie sheet so they are easier to put in and out of the oven.

    Sandbakkels (9)Sandbakkels (10)

    Bake for 10 to 13 minutes at 375, until they are lightly browned on the edges.

    Sandbakkels (11)Sandbakkels (12)

    Let them cool for 5 minutes then gently turn over and tap out.  Finish cooling on a wire rack.

    Sandbakkels (13)

    Once cooled fill them with whatever your little heart desires, or do like I do, dip in a nice cuppa tea.

    Sandbakkels (14)

    Recipe

    Ingredients

    • 1/2 cup granulated sugar
    • 2 tbsp. brown sugar
    • 2 tbsp. powder sugar
    • 1 cup butter
    • 1 egg
    • 1/2 tsp. vanilla
    • 1/2 tsp. salt
    • 2 cups flour

    Cream sugars and butter.  Add egg, vanilla, salt and mix well.  Mix in flour one cup at a time until completely incorporated.  Press into sandbakkel tins.  Bake at 375 on a cookie sheet for 10 to 13 minutes.  Cool in tin for 5 minutes, turn upside down and tap out.  Finish cooling on a wire rack.

    I hope my GG Emma is proud of me!  I think I can hear her say “godt gjort!, Rhonda”


  • Chocolate Covered Cherry Cookies

    December 11, 2010 by Giggles

    Something about the holiday times that turns, even me, the non-baker, into a cookie fiend.  I rarely make cookies (just ask my cookie deprived family).  It’s not that I don’t like cookies, it’s that I do like cookies.  I like them just a little too much.  They are just too easy to eat.  It usually starts with the dough.  I can’t seem to keep my dirty little hands out of the dough.  Obviously, I’m not the only one, or they wouldn’t have things like cookie dough ice cream.  Or even make cookies that taste like un-cooked cookie dough.  Seriously, what kind of genius is that!

    Fortunately for my family, the holiday season is here, which means they might get a couple of cookies here and there.  They won’t get many though.  I make cookies, I make a lot of cookies, and then I give them away.  After all, it is the season of giving.  Plus I’d rather give to someone else’s waistline as opposed to mine.

    DSC_0103 - Copy

    Speaking of giving cookies away, our local teen writers at the Great Falls Tribune is having a “cookie tasting” (read: how to score free cookies) and asked their readers to bring in a dozen of cookies for them to taste.  A diabolical plan to be sure.  What better way to get dozens of cookies to eat without doing any of the work.  Brilliant!  Not needing much of an excuse, I capitalized on the opportunity to make some cookies.  To my families happiness, I was only giving up one dozen, which left them a dozen to eat.  Okay, not quite a dozen, since some of the dough seemed to disappear before it ever made it to the oven.

    The cookies are a take on a classic favorite, chocolate covered maraschino cherries.  The base is almost brownie like, topped with a maraschino cherry and then covered with chocolate.  To give it a more festive appearance, I drizzled them with some white chocolate and then topped them with some green sprinkles.  Red, white and green, yep, very seasonal.

    I started off by mixing the dry ingredients in a medium bowl.

    DSC_0051DSC_0054

    Being the lazy baker, cook, person that I am, I mixed the sugar, butter, egg and vanilla all at once.  I think you are supposed to cream the butter and sugar first, then add a beaten egg and then the vanilla.  Whatever, this works too.

    DSC_0058DSC_0062

    I added the dry ingredients, first one half and then the other.  The dough was very dry and crumbly.  Don’t worry, when you grab a handful and press it together, it will form into a little ball.  I made  a 1” ball of dough for each cookie.

    DSC_0063DSC_0071

    Drain the cherries and reserve the liquid.  Place the balls of dough on a parchment lined or greased cookie sheet.  Using your thumb, make little wells to hold the cherries.

    DSC_0044DSC_0065

    You can melt the chocolate and cherry juice with the sweetened condensed milk on the stove top, or put it in a microwave safe bowl and melt it in the microwave.  Nice and easy!

    DSC_0075

    Cover each cherry with the melted chocolate.  They look like little chocolate mountains.  Bake at 350° for 10 minutes.

    DSC_0078

    Watch your dog watch everyone else while they bake.  It’s what I do.

    DSC_0098

    Once the cookies have baked and cooled, melt the white chocolate.  Using the microwave or stove top technique, melt the white chocolate chips with the sweetened condensed milk.

    DSC_0081

    Drizzle the baked cookies with the white chocolate and add sprinkles if desired.

    DSC_0082

    I packaged my cookies up in a nice tray from the dollar store.  A perfect way to share, look good and not worry about getting any dishes back!

    DSC_0004

    Recipe

    Ingredients

    • 1 ½ cups all-purpose flour
    • ½ cup unsweetened cocoa
    • ¼ tsp. salt
    • ¼ tsp. baking powder
    • ¼ tsp. baking soda
    • ½ cup butter, softened
    • 1 cup sugar
    • 1 egg
    • 1 ½ tsp. vanilla
    • 24 undrained maraschino cherries
    • 1 6 oz. pkg. semisweet chocolate pieces
    • 2 oz. white chocolate chips
    • ½ cup plus 2 tbsp. sweetened condensed milk
    • Sprinkles if desired

    Directions

    In a large mixing bowl combine flour, cocoa, salt, baking powder and baking soda, set aside. In a large mixing bowl, cream butter, sugar and egg, add vanilla and gradually add the dried ingredients. The mixed dough will appear to be very dry.

    Shape dough into 1-inch balls; place on ungreased baking sheet or on a parchment lined cookie sheet. Press down center of each ball with your thumb. Drain cherries, reserving the liquid. Place a cherry in the center of each cookie.

    In a microwave safe bowl heat the semisweet chocolate pieces with ½ cup of the sweetened condensed milk and 4 tsp. of the reserved cherry juice. Microwave on high for 1 minute and then stir, continue to heat and stir for 30 seconds at a time until the chocolate is smooth and creamy.

    Spoon about 1 tsp. of the frosting over each cherry, covering the entire cherry. Bake at 350°F for 10 minutes. Cool completely.

    In a heat proof microwavable bowl, heat the white chocolate chips with the remaining sweetened condensed milk in the microwave for 1 minute. Stir the mixture, continue to heat and stir for 30 seconds at a time until the white chocolate is smooth and creamy. Drizzle the white chocolate over the cookies and top with sprinkles.

    I’d like to thank Quay Po Cooks for honoring me the Stylish blogger Award.  I was truly touched by the thoughtfulness.  It’s so nice to be recognized by your peers!


  • The Ultimate Tuna Melt

    December 9, 2010 by Giggles

    This week has started off very busy.  It’s been all about the Baby boy.  I work 50+ hours a week and I barely have time to make dinner some nights.  It really depends on my schedule.  When I work the “open” shift I get home early so I can plan a nice meal, when I close I don’t get home until late at night, but I have the morning to make a casserole or crockpot meal for the guys.  Then I work a “mid” shift.  This is my most challenging shift.  It gives me enough time to relax and have a cuppa before work, but I get home when it’s dark, and I only have a couple of hours before bedtime, which means that I want uncomplicated meals.

    That being said, I work the mid-shift this week and I had a couple of band concerts to go to.  The Baby boy loves band!  He participates in any band he can, that translates to going to not one but two, 2 to 2 1/2 hour concerts in a row (I just wrote “2” 4 times in a row..two, 2, to and 2…weird…just sayin).  No problem for the beginning of the week.  I planned ahead and made a big batch of enchiladas on Sunday and it got us through Monday and Tuesday. 

    Then tonight, the Baby boy says “Mom, remember that SCUBA safety meeting that was scheduled in November but had to be rescheduled”

    I got a sinking feeling…”Uh, yeah, the note is still posted on the fridge”

    “It was rescheduled for tonight” he says.

    “What time tonight?”  I’m hoping it’s like 7:30 pm, you know a couple hours later.

    “Like at 6:30” he says like it’s no big deal.

    “6:30!”  That left me 45 minutes before I had to go brave the icy roads and sit and listen to some SCUBA guy tell me all the scary things that the Baby boy would encounter diving in the school swimming pool.  Of course he doesn’t know that my dad owns a Scuba shop, so I already know what I need to know.  But I understand that I have to go or the Baby boy doesn’t get to play.

    A quickie dinner it had to be.  Fortunately I had just the thing.

    DSC_0025

    Confession time.  Last July I visited my in-Laws in Westport, we stopped at Merino’s Seafood Outlet.  Where I got all dreamy eyed and remembered the days when seafood was just a few steps away.  Now there is a cow pie just a few steps away.  Strangely enough they both stink.  I really wanted to pack up some fresh seafood and drive it back to Montana, but it really wasn’t practical.

    Wesport Old Fashioned 4th (79)

    So I admired what else they had to offer.  I ended up purchasing some of their Bloody Mary mix and they gave me one of their clean crab tins (this one they use to hold their gloves).

    Wesport Old Fashioned 4th (86)Wesport Old Fashioned 4th (85)

    I also purchased a canned six pack of wild caught albacore tuna.

    Wesport Old Fashioned 4th (81)Wesport Old Fashioned 4th (88)

    It’s the best canned tuna ever.  So good in fact that I still had 4 of the six cans left.  Say what?  You now how you love something so much that you don’t want it to go away?  That’s where I was at.  I had 4 cans of the best tuna and I was acting like I would never be able to get more.  I got over that, I needed a quick dinner and my tuna was going to go to a good cause..

    Enter tuna salad sandwich.  Only I wanted to do more than just a regular tuna sandwich.  Tuna melt; I haven’t had one in decades, perfect quick warm weekday meal.  Only I wanted to do more than just a grilled tuna and cheese sandwich.  What if I made it the ultimate tuna melt by using Texas Toast bread and dipping it in a egg batter Monte Cristo style?

    DSC_0016

    What I ended up with, besides that little piece of celery in the picture that seems so out of place, was a crispy outside and a creamy inside with little burst of crunch (see the ‘out of place’ celery pictures).  I honestly have to say that this is the best tuna melt I’ve ever had in my life.  Maybe if was the quality of tuna?  Maybe it was that thick sliced bread dipped into the egg batter just long enough to give it a custardy layer and a crunchy outside.  Or maybe, it was just the right combination of all the ingredients that made me feel like I was getting something decadent versus just a tuna salad sandwich.  What ever it was, doesn’t matter, it was seriously, no the ultimate tuna melt!

    DSC_0026

    Recipe

    Ingredients

    • 12 slices Texas Toast (extra thick sliced bread)
    • 2 (6 oz.) cans of tuna
    • 1/2 cup mayonnaise
    • 1 rib celery, finely chopped
    • 2 tbsp. onion, finely chopped
    • 2 tbsp. red pepper, finely chopped
    • salt and pepper to taste
    • 6 slices American cheese
    • 3 eggs
    • 1/3 cup milk

    Instructions

    Pre-heat griddle or pan over medium heat.  Mix the tuna, mayonnaise, celery, onion and red pepper.  Add salt and pepper to taste.  Spread tuna on a slice of bread, top with a slice of American Cheese and top with another slice of bread.  Repeat until 6 sandwiches are made.

    Beat the egg and milk together.  Dip each side of the sandwich in the egg batter, dip for about 10 to 15 seconds but not to long.  Let the excess drip off.  Grill each side until they are a nice golden brown.  Serve hot.


  • ©2010 The Kitchen Witch Blog - All Rights Reserved
    Website Designed and Developed by Shortgrass Web Development