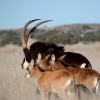
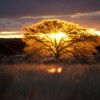
A few weeks ago, when all was right with my world, McGyver and I embarked on an adventure of a lifetime. Honestly, we never dreamed that we would be going on an African safari. The seed was planted several years ago shortly after we moved to Great Falls. My friend TMP was from South Africa and has an outfitters business Qwatali Safaris. She suggested that we join the Safari Club International and go to their annual banquet/fundraiser.
Every year hunts are donated to the SCI to be auctioned off as a fundraiser. Our second year attending, unbeknownst to McGyver, I bid and won us a Safari with Johnny Viviers/Wintershoek Safaris. We won the grand slam of Springboks. If you have no idea what a Springbok is, you can check it out here. Essentially they are antelope and they are also a major rugby team. McGyver was beside himself when I told him we were going on safari! To make it even better, TMP grew up about 40 minutes from where we were going. Like the thoughtless person I can be, I invited myself and McGyver to TMP’s parents home, to round off our trip.
One and half years later, we were finally on our way. I was all prepared with my khakis, big hat and sunblock. McGyver made sure arrangements to ship his rifle were ok and we took off. First we made a pit stop in St. Louis, Missouri for my Not Son’s high school graduation. It was stinkin hot and I liked to have died, but we were proud of him and glad we came.
We flew from St. Louis to Atlanta Georgia and then a 15 1/2 hour flight to Johannesburg. Surprising the flight wasn’t bad, meals, snacks, drinks (including alcoholic) and on demand movie were provided. We touched down in Jo’berg and was met by Godfrey, from Africa Sky guest house, the B&B we were staying out for the night. Godfrey assisted us with our luggage and the firearm. I have to say that our accommodations were outstanding, so was the service and the food!
On the following day we attempted to fly into Kimberly. I say attempted because the weather was not cooperating. The country typically does not get heavy rains this time of year, but it seems that we brought the rain with us from Montana. The weather was so bad that we could not land in Kimberly. We then flew to Bloemfontein, and we still couldn’t land so back to Jo’berg. A whole day lost. Our international cell phones didn’t work, fortunately some kind folks called our outfitters for us and let them know what was going on.
Here is where we started to understand African time. We waited to get our luggage, we waited t be rebooked, we traveled across a zillion escalators and square footage to our hotel, we waited to be booked into our room. All in all in took the entire day and into the night to get re-situated.
The next day, we started over. With only an hours delay we were finally off to Kimberly. This time we landed and our professional hunter, Frikkie, met us. No problems unloading, or with the rifle, things were looking up. We headed off to camp Wag ‘n Bietje ( it means wait a bit in Afrikaans, named after a common acacia tree with thorns that grab onto your clothing and make you…wait a bit). After unloading our luggage, we immediately had a celebratory drink of Amarulo and were taken on a driving tour. We came back that evening for dinner and unpacking.
We really had to rough it…we spent our first few days with McGyver hunting and me shooting pictures of our time. We also toured their on-site taxidermy place.
The following are photos that I took while we were at camp Wag ‘n Bietje and of my photo safari that I took one morning while McGyver was out hunting. Warning, some pictures may be disturbing, this was a hunting trip so there are some “trophy” shots. The pictures are from just the first two days we were out on Safari. I took more than 800 photos! I created a collage, for a quicker viewing, honestly I could post for months about everything we did and all the details of the hunt, but I will spare you…this time. If you mouse over the photos you will get a a label, in case your wondering what that weird animal with the curlicue horns is.
Why yes, that was a baby Rhino! Someone had killed his mommy, so the the secretary, Ansabet, was raising him until he could be put back in the wild. I know, how cool that I got to play with a baby Rhino. I will tell you that you have to watch your toes!
The klipspringer is real, it’s another one of Ansabet’s rescue animals, in this case more of a pet.
Some other interesting stuff, we were there with another couple and they were from Florida. M&M, if you are reading this, we had a great time with you! By the way, Mr. M got a cape buffalo, down with one shot! Another guest arrived, a zoology professor from Edinburgh, Scotland. He was doing research on the stress animals go through during a hunt and live kill, I believe he was comparing it to live capture. Anyways, he was there to draw blood right after a kill and analyze it. He is an animal lover and vegetarian, can you believe what he had to put up with to get his research!
If you are wondering what happens to the meat, don’t worry it is all used. We were served kudu, buffalo, springbok, etc. Some of it is for the lodge and most of it is donated.
I actually had a recipe that I recreated at home to post, but I didn’t save the pictures before deleting what was on my card…well, that’s just the way my life is going right now.
We leave today for a long weekend up at the cabin. Next week I’ll post part deux of our trip. Enjoy your weekend!
Some of you may have noticed that I’ve been MIA. A random tweet, a quick peruse every few days through Facebook and my Google Reader but nothing more. Not a post in a week, a few comments on other blogs, not much of anything else tough. Why? Even after returning from an adventure of lifetime, I just couldn’t bring myself to post.
On Tuesday, June 21st, the first day of summer, the first truly nice day of the year, I went to work. Then after a two and half week vacation I left work, unemployed. That’s right, you read it right, I no loner *gulp* have a job. For the first time in 25 years an employer no longer wants me.
I can’t even begin to tell you how devastated and how hurt I was. Actually I wasn’t devastated or hurt–at first, I was shocked. So shocked in fact, that I asked no questions, I didn’t cry (still haven’t…’cept a few escaped tears). I gathered my things and left.
Numbly, I called my husband, who offered to come home early, told my Baby boy and then started in on housework, making lists of things to do, I did some errands and then got drunk, oh yes, I did. I know, not the solution, but temporarily I felt good and that’s all I wanted right then.
I didn’t even spend my entire evening talking about it to McGyver, nope, not gonna talk too much (it might make it real). Fortunately, I went to bed early enough to sleep off the effects and not be doubly miserable the next day.
I wasn’t alone in the change with the company, as a matter of fact there are 7 of us that are now without jobs. Can someone say “support group”? If there are 7 of us, why do I feel so alone? At a loss? Who am I now? What will I do? Will we survive?
I can’t believe the amount of emotions coursing through me. At times I’m positive and ready for new life challenges, the other times I’m pensive and withdrawn…playing my last employment over and over in my mind. The never ending questions of how? Why? Could I, should I have done something different. Am I disillusioning myself, was there any indication of what was going to happen and I buried my head in the sand? Then there is the anger! How could you! I don’t deserve this hot mess I’m in! What about all the good work I’ve done for you, does that not mean anything?
I keep picking myself up. Like the mature (read: old) woman that I am, I have to face my situation. I called family and friends, not to whine or complain but to let them know about this huge change in our lives (okay, so a little whining and complaining happened, but not much, I promise).
Unemployment doesn’t just effect the individual, it effects everyone they associate with. When finances are reduced so are activities, extra-curricular things have to go by the wayside and you become must become frugal (this will be toughest for the Baby boy). No matter what terms you left on, all those work friends drift away and an entire social circle, nay, your other family, dissolves right before your eyes.
Sometimes I think of stupid stuff like, I left this or that at work, or I didn’t get X done. These random thoughts pop into my mind and I drift away into my old world, sometimes in the middle of the night, sleep then escaping me for hours. And then the positive….
I’m a list maker, I’m a doer. Haven’t I always wanted time to get yard work done, scrub my house really good, devote real time to my blog and not just hurried posts? What about that little hobby of jewelry making? I could practice photography and teach myself Photoshop. I could go to the cabin every weekend and not feel guilty about not getting work done at home…I have the week for that. There are a million and two things to do, now that I have the time.
So I already find my days so filled with trying to fill them that I haven’t as much time for leisure as I thought I would. I watched only a couple of hours of late night TV and spent little time on my computer, except to work on my resume and job search. I have a feeling that time will pass quickly and that I’ll be glad that I got to spend this time with my Baby boy.
There it is, out in the open. I struggled with whether to share my situation or not. I believe blogging isn’t only about painting this perfect and ideal picture of life, it is part the bloggers life. I can not categorize or separate every part of my life, they are to integrated, the good and not so good. Blogging is an integrated part of my life also, I chose to share. Isn’t that first part of healing?
For my dear readers, I hope I haven’t run you off with my woes!
So, here’s to the changes in life and making the best of them.
Now, please excuse me while I finally go bawl my eyes out.
I know, I know, a corny title. I can’t help it, it’s true. McGyver and I recently got back from a Safari in South Africa, we stayed near Kimberly and had an incredible experience. I have zillions of photos; I am currently sorting through them as I have time. I This is my first experience shooting in RAW and converting (I’m probably doing it the hard way) Expect some upcoming vacation related posts.
In the mean time I’m sharing my best photo from the trip, enjoy.
Only 4 ingredients: Chicken, butter, salt and pepper. The perfection of this roasted chicken isn’t hours of brining or fantastic, or even exotic ingredients and seasonings, it’s the cooking method and the butter. Oh my, what the butter does to this chicken. The butter transforms a regular chicken into a super succulent, super moist meat with wonderfully crunchy skin.
It was all I could do to resist from pulling the skin off and shoveling it in my mouth, it’s all for me, me, me. I confess that I didn’t resist completely as little tidbits here and there seemed to drift naturally into my mouth and disappear down into my gullet.
Slow roasted chicken is exactly that, slow roasted…a perfect weekend family meal headliner. Speaking of family, this couldn’t be more kid friendly, with just a few ingredients, what’s there to hate?
Note: it’s important for follow the cooking directions carefully in order to attain the moistest chicken with crispy skin. The cooking method is loosely adapted from America’s Test Kitchen.
Recipe
Roasted Butter Chicken
1 whole chicken, 3 1/2 to 4 lbs.
1/2 cup butter, softened slightly and thinly sliced (1 1/2 to 2 tbsp. set aside)
Kosher Salt and Fresh Ground Pepper
Preheat oven to 375F. Rinse and clean chicken, pat dry. Using your fingers carefully slip them under the skin and separate the skin from the flesh in every place possible. Be careful not to tear the skin. Slide the thin slices under the skin and distribute evenly. After all except 1 1/2 to 2 tbsp. of the butter is under the skin, gently massage the butter to spread out over as much of the meat as possible.
Melt the remaining butter and brush it over the outside of the chicken. Liberally sprinkle with kosher salt and black pepper. Place chicken on a rack breast side up in a roasting pan. Roast breast side up for 45 minutes. Remove from the oven, turn the oven down to 200F then carefully turn the chicken over so it is breast side down. Roast the chicken for an additional hour.
After 1 hour, turn the oven up to 400F and roast for 10 more minutes, next remove the chicken from the oven and turn it back to breast side up. Place back in the oven for another 10 to 15 minutes or until a meat thermometer reaches 170F to 175F.
Let rest before carving, and get ready to smack hands as they try to pull the chicken skin off and eat it before dinner.
I’m never buying Caesar dressing again, never ever. Hands down, without a doubt I just made the best ever Caesar dressing.
Do you get what I’m saying?
Do you know what I mean?
Do not buy Caesar dressing ever again.
And make this right now!
Here’s the tricky part, making garlic paste. It’s not tricky really, but it takes a little effort. Start by mincing the garlic super fine, then sprinkle some kosher salt on the minced garlic. Using the edge of your knife, press the garlic and salt into cutting board using a smearing action, until the garlic turns into a paste.
I’ve posted about my little dressing mixer before by Chef’ n Salad , I still love it! If you don’t have one of these little wonders, you can mix the all the ingredients except the oil in a bowl and then slowly whisk in the oil.
See my pad of paper and pen in the background? It stays with me in the kitchen as I develop and modify recipes, what about the rest of you? Do you keep recipes in your head, write it down or keep track via computer? Are you all as old fashion as I am?
Other than the dressing, Caesar Salad is wonderfully simple; romaine lettuce, grated parmesan cheese, croutons and Caesar dressing, that’s it!
I’m not trying to run a promotional, trust me, Tupperware is no way interested in my blog, but when you love something you have to share it. How do I love my Tupperware salad spinner? Let me show and tell you the way.
I love the size of my salad spinner, a whole head of lettuce easily fits into it, sometimes two. After chopping the lettuce (and other vegetables if you like), it is placed in the colander and rinsed, then place the colander into the outer bowl and put the spinner top on. The top is notched so that it fits into the colander only one way, no brainer, love it. Using the knob you spin your salad, “round and round she goes, where she stops nobody knows”. Remove the spinner and colander and you can see what is collected at the bottom. I rinse mine at least twice and sometimes three times depending on the amount of dirt water collected.
After all the rinsing and spinning is done…are you ready for this? I love this feature! Just pop the lid on it and put it in the fridge. The excess moisture continues to drain off and creates the ultimate crisper. Get this, I’ve had lettuce last up to two weeks!!!! I wouldn’t lie to you. Just make sure not to add items like cucumber, tomatoes and mushrooms, or other items that get slimy fast. I typically have grated carrot, cabbage, or radicchio in my basic salad, then I add the moist ingredients just before serving…ahh but I digress. There is one more thing I love about this spinner, when it’s not in use, the spinner part fits upside down into the colander, put the lid on it and it’s ready for storage. Hey I forgot to mention that it has little rubber feet that keep it from slipping no matter how hard your Baby boy spins it.
Did I mention that I love this salad spinner by Tupperware?
I think I mentioned that I loved it about 15 and half times.
At the risk of sounding like a hostess from the Home Shopping Network doing a kitchen special, there is one more item that I use over and over and over. My Zyliss cheese grater, it goes on my table when ever I serve a dish that would benefit from some freshly grated hard cheese. If you don’t have one of these, stop depriving yourself, you’ll be glad when you get one.
No photo, and not a plug for another product, but I recently discovered Anchovy paste, it comes in a handy tube so it’s a snap to mix up in some dressing or put in a sauce without worrying what to do with those left over little fishies?
Recipe
Caesar Salad
1 head romaine lettuce
Croutons
Grated Parmesan Reggiano
Fresh ground black pepper
Caesar dressing
The dressing
4 cloves garlic, minced, mixed with 1/4 tsp. kosher salt and made into a paste
1 tbsp. Dijon mustard
1 tbsp. champagne vinegar
2 tbsp. mayonnaise
1 tbsp. lemon juice
1 tsp. Worcestershire sauce
1 tsp. Anchovy paste
1/2 cup extra virgin olive oil
Salt and pepper to taste
Begin with the dressing. Mix the garlic paste, Dijon mustard, vinegar, mayonnaise, lemon juice, Worcestershire sauce and anchovy paste. Slowly whisk in olive oil, or pour slowly into a blender or food processor if using one. If you are using a dressing mixer like I did you can add the oil all at once and blend. Add salt and pepper if necessary. Refrigerate at least 30 minutes prior to serving.
Meanwhile, cut and wash you lettuce, use a spinner if you have one. If you don’t have a spinner, pat your lettuce dry it helps the dressing adhere to the lettuce. Place the romaine in a very large bowl, drizzle with Caesar dressing and toss to coat. Serve with homemade croutons, fresh grated cheese and fresh cracked pepper. I like to put extra dressing on the table for my family members who like their salad sloppy.
Sometimes life gets in the way of riding, cooking, photographing and blogging like I want to. There just isn’t enough time, often times I’ve thought “I should have waited till I retired to do a blog”. I’ve even thought about putting it on hold for awhile, you know, while I try to catch up on life. But. I. Can’t. I love it, I really do.
Especially when I have one of those days. The day when the weather is great, I don’t have a million chores and errands to do. A day where I can take a recipe idea in my head and make it real, cook it early enough while it’s still light out and have plenty of time to stop and photograph along the way.
The day came when McGyver was out of town, the Baby boy had plenty of things (other than bugging me) to do. A day where I said, forget the chores, forget the errands, cook and take pictures at your leisure. It was a spectacular day, a day I wish I could repeat everyday!
My wonderful cooking day started with compound butter. I took it out of the fridge and let it set at room temperature to soften up, so nice to have the time to do that with out much prior planning. I puttered around the house, caught up my Google Reader and basically killed time while the butter softened…I might have even made a quick trip to a nearby antique/second hand store (see juicer).
After all that puttering around, I realized that a wee bit more time had slipped by than I planned, so I hurriedly mixed up my butter compound, rolled it up and stuck it in the freezer to firm up quickly. Back on track, I felt I had all the time in the world…
I prepped my pineapple for grilling, I even shot a tutorial on how to prepare a pineapple wedge.
The chili rub was sprinkled on approximately 30 minutes before I grilled, I let the pork sirloin steaks sit out at room temperature for 30 minutes. I knew my pork would have to cook quick or I’d have blackened pork instead of a nice grilled steak.
Allowing meat to warm up before grilling shortens the time on grill and ensures you don’t have a well done outside and a cold inside.
I’m a grill queen, poor McGyver has lost the man throne of grilling, it was usurped by his loving wife. One of my resolutions this year was to let go of some of the cooking…like the grilling, but McGyver wasn’t here so it was all mine!
When I grill meat I like to put wax paper or another kind of liner on a platter, when I put the meat on the grill I throw the liner away and now I have a clean platter for the cooked meat. I also pile items up on a large sheet pan to transport out to the grill, it saves time and steps, plus I have a place to put cooked items.
The pineapple was absolute perfection with the spicy pork, and the melty cilantro and lime compound butter gave a richness and a crisp contrast to the chili rub. In my book a meal couldn’t have been better: smoky, sweet and spicy, with a teeny bit of tartness. I did my best to eat it all, I really did.
I had the luxury of setting a table up outside, taking the time to set up “a scene” instead of just a quick food shot, I even got out a stool and took pictures from different views. Even now as I type up this post after a 12 hour work day, I’m feeling the euphoria of something so perfect and so right. And coincidently home alone, unbothered to draft my post.
The glass of wine next to me, might be helping the euphoric feeling?!
I loved this day, I loved this meal..now about that retirement plan…
Recipe
Chili Rubbed Pork Steak with Cilantro Lime Butter and Grilled Pineapple
Compound Butter
1/2 cup (1 stick) unsalted butter, softened
1/4 cup finely chopped cilantro
Zest of 1 lime
Juice of 1/2 lime (about 1 tsp.)
1/4 tsp. salt
Pork Steaks
2 pork sirloin steaks, bone in
1 tsp. chipotle chili powder
1/2 tsp. ground cumin
1/2 tsp. smoked paprika
1/4 tsp. garlic powder
1/4 tsp. onion powder
1 1/2 tsp. Kosher salt
1 Pineapple, peeled, cored and cut into wedges
1 lime grilled (optional)
Mix butter, cilantro, lime zest, salt and lime juice, until well blended. Using your hands, form into a small log, about 1 to 1 1/2 inches in diameter. Wrap the butter in wax paper or plastic wrap. Refrigerate for several hours or place in the freezer for 1 hour to firm up. Remove from wrap and let set at room temperature about 5 minutes before slicing.
For the rub, mix all the dry ingredients and sprinkle evenly over the pork steaks, covering all areas. Let it sit at room temperature for 30 minutes. For a gas grill, cook over high heat approximately 7 minutes, then turn, cook for an additional 7 minutes. Midway through cooking the pork steaks, add the pineapple wedges to the grill, cook 3 to 4 minutes on each side.
Serve the pork steaks immediately with a pat of compound butter and a couple of wedges of pineapple.
If desired, you can grill some lime (cut in half and place on the grill the same time as the pineapple) and serve on the side.
Saturday morning, after a long week I wanted to make some home made biscuits for breakfast. They had been on my mind all week. Biscuits, warm and flaky. After making a pot of coffee, I delved into the refrigerator to get my ingredients.
Hmmm, no buttermilk, no regular milk, only 2 tbsp. of butter. Yeah, biscuit aren’t going to happen, I certainly wasn’t motivated to actually get dressed and go to the store early in the morning. Then I remembered my mom used to make drop biscuits all the time, that thought got me to thinking. If I don’t have to roll out the dough, I don’t have to use cold butter, I can substitute, oh I don’t know, bacon fat? Mmmm bacon fat, another thought, how about some bacon in those biscuits?
I still didn’t have milk or buttermilk but I did have a 1/2 cup of sour cream. Mmmmm sour cream and bacon, and yet another thought! (Boy was I doing a lot of thinking…surprised I didn’t burn down the house.) I could add some cheddar cheese. The mostly empty larder still had a few gems in it!
I set to work, and had the biscuit dough whipped up lickety split and into the oven. Breakfast was ready in no time. Only problem, that meant I had plenty of time to go grocery shopping.
Recipe
Sour Cream, Bacon and Cheddar Biscuits
2 cups flour
1 tbsp. sugar
3 tsp. baking powder
1/2 tsp. salt
1/4 cup bacon fat or melted butter
1/2 cup sour cream
3/4 cup water, milk or buttermilk
6 slices of bacon, cooked crisp and crumbled
1/2 cup grated cheddar cheese
Preheat oven to 450F. Mix dry ingredients, add bacon fat, sour cream, and liquid. Mix thoroughly, if mixture looks dry add more milk by the tablespoons (the dough should be slightly sticky). Stir in crumbled bacon and grated cheese. Drop by a large spoonful onto a greased cookie sheet. Bake for 10 to 15 minutes.
Guest Blogging by McGyver on a Motorcycle Monday because Giggles left her ‘puter logged on and I hot wired the dashboard to her blog.
Once upon a time, back before Evo engines with Electronic Fuel Ignition, motorcycles came with a CARBURETOR, which was a device for mixing a fuel/air ratio to ensure a proper ignition in the engine. (No, this is not a course in motorcycle engineering for the Stone Age, that’s for another post). Here is a picture of the Harley Linkert Carb, attached to a flathead engine (said Stone Age post). The throttle would manually increase or decrease the amount of fuel in the mixture; increasing the speed of the engine and hence the motorcycle. This gave rise to such quaint expressions as “twisting the wick”, “screwing it on” and when the throttle cable broke when full open “Hot Shit! Holy Damn! Aieeeeh” as your engine screamed for redline and beyond (signified by a very loud expensive sound and misc. engine parts scattered across the road and possibly embedded in YOU as your motor grenaded!). Were you able to get your motor shutdown and coast to the side of the road, you then faced the problem of getting to a nearby populated area that might have an establishment, that might have a cable that would do the trick.
Oddly enough, this situation once happened to the ol’ Poop, otherwise known as my Dad.
Being a dutiful Son, I actually paid attention when he would recount adventures he had experienced on the road.
(The man has been on the road for 67 years and is still riding. He has other rides, but I thought you’d like this one; a Harley Hummer )
Fast forward a few years and it’s 197X. I get a wild hair and take off for a while; motorcycle of choice, a normally aspirated (carburetor, thank you) over-bored Harley 74 Panhead.
24 coats of gloss black lacquer. Extended forks. High bars. Solo seat. P-pad.
Sleeping bag on the handmade sissy bar with my clothes rolled into it. No peanut tank, I’m running out west, not in Frisco (and yes, I know it pees you off). As I’m wandering the highways and byways of Idaho, Northern Nevada and Wyoming, I crank the throttle to the max just because. Did I mention that mostly there’s lots of free space (no urban development) in the West, even now? So, I’m probably 100 miles, give or take, from a parts store, let alone a Harley (or any motorcycle) dealer, and all of a sudden there’s lots of free play in the throttle and the engine is headed for redline. I shut it down and coasted to the side of the road. Hmmmphmp! Broken throttle cable. Spare? Don’t be silly. It was all I could do to buy gas (at 27¢ a gallon!) back then. So, I remember the important information the ol’ Poop had passed on.
How to get out of the situation.
I’m in Idaho (I think). Barb wire is important.
This is Barb Wire. Attractive, and possibly useful, but not in this situation.
Ahh, Barbed WIRE . This is useful, but not as attractive. Nice pic, though.
Next a pair of dikes. This is a pair of dykes. Though potentially useful, they probably won’t help you. (You male oppressor, you) [This is a pair of a pair of dykes, or four of a kind, and if we keep this up, we’ll blow up the blog]
This is also a pair of dikes (spelling difference). These will help you.
Right, here’s how it’s done. Go to the Barbed wire fence and cut about three foot of wire. Wear your riding gloves, it’s BARBED WIRE for Pete’s sake! Cut ONLY one strand and unwrap carefully from the barbs and the other strand. Snip the end of the free strand you just unraveled to get about a three foot length of wire. This will leave one strand holding the fence together, keeping the fence intact, and preventing a wandering cow from causing another motorcyclist a near death experience. (see what I did there, Honey?)
Make a loop in one end big enough for your index finger to fit comfortably as well as being able to slip the wire from your finger quickly. Attach the other end to the throttle lever on the carburetor, after having determined how long your improvised finger-actuated throttle control mechanism needs to be for your bike. Voila! You have reinvented the original push pull throttle! You can ride using this, though it’s a real balancing act. IF it happens and you HAVE to do this; SLOW is the word. You are not as delicate with your MK 1 finger as your twistgrip. Get to town. Buy a cable. Replace your innovative improvised finger-actuated throttle control mechanism.
OK, boys and girls, that’s your motorcycle Monday blog of the week. Hope you’ve enjoyed the nostalgia and maybe learned a little something about what it was like when the only riders were the long distance BMW guys, Shriners and 1%s. There’s a couple of promises in this one for another post, so we’ll see what happens next.
Today we leave on a trip that we’ve been planning for 1 1/2 years. Don’t worry, I have posts lined up for you, I wouldn’t want anyone to go into withdrawals are anything Because of where we are traveling to, I will not be able to reply to any posts, no tweets and no Facebook. Although I’ll be out of touch, I’ll be thinking of you all.
Pot roast at this time of year? Although it has warmed up else where we seem to not be getting a break here in Montana. I don’t think I’ve seen the sun in a week and haven’t stopped wearing a hoody or jacket except for a couple days.
Even if it was scalding hot outside and I didn’t have air conditioning I would still make this pot roast. The ingredient list is simple but the flavor is anything but (hence the name “Plain ‘ol Good Pot Roast). The roast was melt in the mouth tender and the sauce/gravy, whatever you want to call it, was nothing short of amazing. In fact I’d go so far to say that it tasted very similar to Ossobuco, seriously. If that isn’t enough to make you want to sweat in the kitchen on a summer day I don’t know what is. Naturally that is never an issue up North!
I have to admit that I’m lucky, I get organic grass fed beef for cheap! The cost may be low but it tastes like a million bucks.
Like all pot roasts, it starts off with browning in a Dutch oven. I did the TKW way, browned it in bacon fat, yeah baby!
I rarely cook without onions and garlic, as far as I’m concerned they are the food of the Gods, or at a minimum the Goddess Hestia (who is actually the Greek Goddess of Cooking). I used to read a lot of Greek Mythology when I was young.
An addition of some fresh herbs, water and a can of diced tomatoes, finished off the round of ingredients.
Pop it in the oven, cook it low and slow, and go about your day. Come back in 5 hours to an incredibly tender and flavorful roast.
I skimmed the fat off the top, it’s yummy but even a little to greasy for me.
I used my blender stick to puree the sauce….just a note, I didn’t have enough liquid to submerge it and I made quite the mess until I tilted the pot…sorry Baby boy (he had dish duty)
I served this with a nice salad and Pioneer Woman’s Buttered Rosemary Rolls. She made a wimpy 6 rolls, I made a huge pan full (great for sliders later then again, I’m all about the leftovers).
Recipe
Plain ‘ol Good Pot Roast
1 4 to 5 lb. beef roast (chuck, shoulder or arm)
Kosher salt and fresh ground pepper
1 tbsp. bacon grease or oil
1 onion, halved then sliced
3 to 4 cloves garlic, peeled and lightly crushed
2 bay leaves
Sprigs of thyme and rosemary
1 can (14.5 oz.) diced tomatoes
1/2 cup water
Preheat oven to 300F. In a large Dutch oven or other heavy bottomed pot, heat fat over medium high heat. Liberally sprinkle salt and pepper over all sides of the roast. Brown meat on each side, about 5 to 8 minutes. Remove the roast and set aside. Add onion and garlic, saute, stirring frequently until onion is tender.
Add the bay leaves and sprigs of thyme and rosemary. Lay the roast atop the onion, garlics and herbs. Pour the tomatoes and water over the roast. Cover and place in the oven, cook for 5 to 6 hours or until roast is fork tender. When done remove the roast and set aside to rest. Dispose of the thyme and rosemary. Skim the fat off the top. Using a stick blender or food processor puree the mixture. If its too thick add water, if it’s too thin put over a burner and cook to reduce it until desired consistency is reached.