The Kitchen Witch Blog: The recipes and ramblings of a biker chick
HomeThe Kitchen Witch Blog: The recipes and ramblings of a biker chickRecipesRamblingsRhondaShopContact UsRecipes
The Kitchen Witch Blog: The recipes and ramblings of a biker chick
  • Maple Wheat Bread and Black and White Wednesday

    November 30, 2011 by Giggles

    Maple Wheat Bread_112211_0032

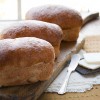
    Baking is not my thing, baking with yeast is even less than my thing.  But sometimes I get the yearning to bake fresh bread, usually in the form of my bread maker.  Then I saw Amy’s recipe for her weekly bread and I got a hankering for skipping the bread machine.  Amy is a local,  she writes articles for our At Home section in the Great Falls Tribune and has a blog called Backyard Bounty.  Amy is an amazing person, she is all about living simply, cooking and gardening, along with raising a family.   I’m super envious of her gardening skills, if only I weren’t so lazy…maybe I can convince Amy to start gardening in my yard?

    It was Amy’s weekly bread that caught my eye and got me to kneading.  Her bread won “The Best Bread” Blue Ribbon at the Montana State Fair.  Blue Ribbon Bread from a great person like Amy, how could I not try it?  Amy’s bread is a whole wheat/white flour blend sweetened with honey (from the bees they raise themselves).  It’s the wheat aspect that inspired my black and white/sepia photos for this Wednesday.

    Sepia Maple Wheat Bread_112511_0021

    McGyver and I went on a drive Saturday to check out some new places to hunt.  We drove out past Highwood and I was awed by the cut wheat fields.  I shot the photo above and the photo below in the exact same spot, I simply turned around.  On the one side is an endless view of cut wheat fields dropping off into the horizon. On the other side you can follow the cut fields till they butt up against the Highwood Mountains (which was our real destination but we missed our turn).  I don’t think I could have found a spot that better represented the farming landscape of the Great Falls area, we’re partly mountains and partly plains.

    TKW Maple Wheat Bread_112511_0017

    If you are interested in seeing more culinary black and white photos or participating, head over to my hostess Susan’s site, The Well Seasoned Cook.

    Maple Wheat Bread_112211_0001

    I made Amy’s bread to go with our Thanksgiving meal.  I made one small change by replacing some of the honey with (REAL) maple syrup.

    Maple Wheat Bread_112211_0007

    I found the bread incredibly easy to make, it was a very forgiving recipe.  For me to say that about a yeast based recipe says a lot!  I baked one large loaf and six mini loaves.  I made the mini loaves to replace traditional style rolls.

    Maple Wheat Bread_112211_0021

    My family loved, loved, loved the bread.  Did I mentioned that my family loved this bread?  The texture was perfect with just a touch of maple to add flavor but not so much to be overwhelming.

    Maple Wheat Bread_112511_0005

    Bonus, the mini loaves made the perfect little sandwiches. Later in the evening when we just wanted a small sandwich the mini bread was the perfect size.  If I had small children at home, I would make small loaves all the time so they could have a personal grown-up whole sandwich instead of a half sandwich.

    This recipe makes 3 large loaves of bread (or 9 minis).  Amy says the bread freezes really well, I’ll have to take her word for it because we don’t have any left over to freeze.

    Recipe_______________________________________________________

    Maple Wheat Bread (Amy’s Blue Ribbon Weekly Bread)

    • 3 cups warm water (110°F to 120°F)
    • 2 tablespoons yeast
    • 2/3 cup honey
    • 5 cups white all purpose flour
    • 3- 4 cups whole wheat flour (you have to kind of play it by feel)
    • 2/3 cup maple (or honey)
    • 1 tablespoon salt
    • 3 tablespoons butter

    In a large stand-up mixer bowl mix warm water and honey, stir to blend.  Sprinkle the yeast on top, add flour and mix well.  Let proof for 30 minutes.

    Cook’s Tip:  Spray your measuring cup with no-stick spray before using, it’ll keep the honey from sticking.  Use the same measuring cup to measure the warm water, it’ll rinse any remaining residue for an easy clean-up.

    After dough has proofed for 30 minutes, add syrup, salt and butter, mix with your stand mixer with a dough hook, on low until well incorporated.  Add 3 cups flour one cup a at a time mixing well between each cup.  Add the 4th cup flour 1/4 cup at a time with the blender running, until dough pulls away from the sides and starts to form an elastic ball (if it’s a little sticky that’s okay).  Turn dough onto a floured surface.  Knead for 5-8 minutes or until smooth and elastic.  Place in a large oiled bowl, cover with a towel.

    Cook’s Tip:  Use non-stick spray to evenly coat your bowl, then spray some on top of the dough and cover with plastic wrap before covering with a towel.  This will prevent the dough from sticking to the towel and save on laundry.

    Let dough rise in a warm draft free area until doubled (about 2 to 3 hours).  When doubled, punch dough down and turn out onto a board, divide dough evenly into 3 loaves.  Form dough into roughly 9×5 rectangles and place into three greased buttered loaf pans.  Cover with a towel and let rice until doubled, about 1 hour.

    Preheat oven to 350°F.  Bake bread for 30 minutes or until lightly browned on top and sounds hollow when tapped.  Let cool 10 minutes and then remove from pans, finish cooling bread on cooling racks.

    Source:  Amy Grisak, Backyard Bounty


    Click to Print a Recipe Card


  • Easy Appetizers at POM

    November 29, 2011 by Giggles

    There is so much to do between now and the up coming holidays.  Especially since I hate shopping and put it off to the last moment!  There is also a lot more entertaining going on this time of year (which I love) so I’ve compiled six easy appetizers to stave off starving guests.

    Brie en Croȗte looks like you went through a lot of trouble but it’s actually very easy.

    Brie en Croute_110911_0002

    Caprese Kebabs are red, white and green.  While they may look like the Italian flag they are also the colors of Christmas.

    Caprese Kebabs_110911_0006

    Crab Salad in Endive Boats, I love to use Belgian endive in place of chips.  Their natural shape lends itself to be filled with something as delicious as crab salad.

    Crab Salad_110811_0025


    Old Bay Cucumber and Shrimp Sliders were the most popular appetizer I served at the last party I attended.  Party goers love shrimp, but what kept them coming back for more?  They loved the sauce and couldn’t figure out exactly what was in it.

    Shrimp Sliders_111111_0013

    Artichoke Fillo Cups are basically artichoke dip piled into purchased fillo cups (of course you can make your own) then baked for 8 minutes and served hot.  What’s nice about these cups is that you can fill them early on in the day and then bake them off just before serving.

    Artichoke Fillo Cups_111111_0008

    Greek Chicken Kebabs are small bites packed with a lot of flavor!  Lemon and rosemary are the star flavors accompanied with kalamata olives and feta cheese they make a pretty appetizer as well.

    Greek Chicken Kebabs_111111_0013

    If these pictures have got you drooling and you want to make some, head over to my post at Pig of the Month for the recipes.


  • Motorcycle Monday-European Honeymoon on a Harley Day 7

    November 28, 2011 by Giggles

    Journal Day 7_112811_0002

    I can’t believe it’s been two weeks since I’ve posted a motorcycle related post on Motorcycle Monday.  The last two weeks have been recipe related with my first ever Daring Cooks participation where I cooked with tea and last Monday, participating in the funniest club ever, Secret Recipe Club where I made Frittitane alla Parmigiana from Manu’s Menu.

    To catch you up a bit my last post, McGyver and I were at the pinnacle of our honeymoon tour, we were in Barcelona, Spain and attending the Rolling Stones concert.  If you haven’t been following along you can catch on our prep days here and here, and days one, two and three, four, five, part 1 of day six, and part 2 of day 6, by following the links.

    It’s a sad day for us, we are leaving Barcelona and taking the long way home so there is much to look forward to…

    Day 7 June 30, 2008

        We were up around 8:30 am, showered, packed (mostly) and had breakfast.  We had a long day ahead of us.  We saw Dave an Val, Dave was heading out with the Rolling Hills Chapter, the oldest H.O.G. Chapter in Europe and Val was flying out with some of the Ladies.

        There was some remorse in the air – one of their chapter members, Keith, was killed while in Barcelona, a sobering reminder of how fragile life is.  Not even knowing him, it still bothered us knowing a biker was killed.

        We set off about 11:00 for an easy days ride.  the weather was beautiful, we couldn’t as for better riding conditions.  We traveled through Spain and into France. 

    Honeymoon Day 70006Honeymoon Day 70007

    I’m never having my picture taken with my helmet again…could I look any dorkier?

    Honeymoon Day 70008Honeymoon Day 70009

    Every rest stop we passed or stopped at was filled with bikers, a beautiful and now familiar sight. 

        We found a charming hotel in Arles, France, Le Chevel Blanc (White Horse).

    image (source)

    After we unloaded, we took a 5  minute walk into town and visited some historic sights.  Arles was a bull fighting town and had a beautiful arena that could hold about 20,000 people, it was built around 90 AD. 

    Honeymoon Day 70014Honeymoon Day 70003Honeymoon Day 70001

       We found a small restaurant off the main drag and had an excellent meal and some Cotes du Rhone wine.  In no time at all I had a nice wine buzz, a good meal…a guitar player/singer came around and put us in that perfect romantic mood.

    Honeymoon Day 70005

    It was time to head back to the hotel…

    Additional Notes:  While touring we never encountered a problem from anyone, even though we were obviously American.  It seemed like as long as we were thoughtful and courteous we received the same treatment.

    Honeymoon Day 70002

    However, we did see some disconcerting comments like the one above “US GO HOME”.   We were pretty sure that they meant U.S. and not us.  It saddens me that to see comments graphitized on the wall.  I think that I was more upset about defacing the beautiful old architecture then I was about the comment!


  • Chicken (or Turkey) Noodle and Corn Casserole

    November 25, 2011 by Giggles

    Chicken Noodle and Corn Casserole_111511_0016

    You might as well go get my crown and schedule my coronation now.  I have just become the casserole queen!  This casserole was so good that I could have my own network show based on this casserole alone!  Seriously.

    Chicken Noodle and Corn Casserole_111511_0006

    The most important criteria for a casserole is comfort.  What speaks better to comfort than chicken (or turkey) and noodles, swimming in creaminess surrounded by down home goodness of corn and topped with crispy butter bread crumbs.

    Chicken Noodle and Corn Casserole_111511_0015

    I combined two iconic casseroles, chicken noodle and corn for a perfect marriage.  A unison so perfect that it will take you to casserole heaven.  Bonus, it’s a great way to use up leftover turkey (or chicken)!

    Recipe_____________________________________________________

    Chicken Noodle and Corn Casserole

    • 3 cups chopped cooked chicken or turkey
    • 1 package (16 ounce) Reames homestyle frozen egg noodles
    • 1 can (15 ounce) corn kernels, drained
    • 1 can (14.75 ounce) cream style corn
    • 3 tablespoons butter
    • 1 medium onion, diced (approx.. 1 cup)
    • 1 stalk celery, diced (approx.. 1/2 cup)
    • 2 tablespoons flour
    • 1 1/2 cups milk
    • 1 cup sour cream
    • 1 tablespoon minced sage
    • 1 tablespoon minced thyme
    • 2 tablespoons minced parsley
    • Salt and pepper to taste
    • 1 cup bread crumbs
    • 2 tablespoons butter, melted

    Preheat oven to 350°F.  In a large pot bring 8 cups of water and 2 teaspoons of salt to boil.  Add noodles and gently boil for 17 minutes, drain noodles and set aside.

    In the same large pot, over medium heat, melt 3 tablespoons of butter.  Sauté onions and celery until the onions are tender, about 5 minutes.  Add the garlic and cook for 1 more minute.  Sprinkle the flour over the the onion mixture, stir and cook for another minute.  Slowly pour the milk in, stirring constantly.  Bring sauce to a boil and boil for 1 minute.  Turn off heat, add herbs, salt and pepper, corn, creamed corn, sour cream, chicken and noodles.  Mix until well combined.

    Pour casserole mixture into a greased 2 quart casserole pan.  In a small bowl, pour the melted butter over the bread crumbs and mix well.  Spread the bread crumbs evenly atop the casserole.  Cover with foil and bake for 15 minutes, remove the foil and bake another 10 minutes.


    Click to Print a Recipe Card


  • Turkey Cranberry Cream Cheese Sandwich

    November 24, 2011 by Giggles

    image

    Turkey Cranberry Cream Cheese Sandwich 2

    This sandwich recipe is not my own.  In the early part of 1997, I was a single, unwed, unemployed mother.  I was trying to get work, even though I loved being home with my daughter Leah, I wanted to get off public assistance as soon as possible.

    I was brought up that people need to earn their own way, there is no shame in getting assistance in times of need but there is shame in leaching off the government or the generosity of others when you are able to work and provide for your family.

    It was difficult for me to find a job, I lived in a town of 5,000 people, jobs were scarce and no one wanted to hire a single mother…too risky, so I was told.  We had a little store called the Penny Saver and they advertised the need for a deli worker.  I applied and got an interview.

    I arrived to my interview, early, the owner took me upstairs (I believe the Penny Saver used to be an old house) for my interview.  The usual questions were asked and then I was asked if I had any children, “yes, a newborn”,  then the owner proceeded to ask if I was married, and I said “no”.  A look came over his face, I knew what was coming.  “Young unwed mothers are too unreliable.”  Not again, the same story.

    By now I was desperate and I had nothing to lose.  I pleaded my case, I told him that I was trying to get off public assistance, to be a productive member of society.  I assured him that I had child care support from my family and my high school best friend.   I didn’t need the money, I got that through public assistance and it was more then he would be paying me.  I needed to earn my own money, be responsible, set a good example for my child and make my family proud.

    Something I said, some look I must have had, convinced him to hire me.  I got that job working in the deli, I never missed a day of work and I was a good employee.  I didn’t work there for long (moved on to a better paying job), but it got me started on the right path, a path of self pride and self worth, a path that has carried through for the rest of my life.

    This sandwich was one of the most requested sandwiches we served.  So popular it was served year round…typically on white soft bread.

    DSC_0016Turkey Cranberry Cream Cheese Sandwich 1

    What does all this have to do with Thanksgiving?  This year I’m looking back and realizing that a lot of things that I’m thankful for now are due to things that happened in my past.  I’m thankful that someone years ago took a chance on a young single parent.  I’m glad that my parents taught me to be self sufficient and proud.  I’m thankful that I had a supportive family and friend that took care of my little girl while I tried to do the right thing.  I’m glad that I had public assistance (I needed it) and even more glad I stopped needing it.  I’m thankful that I was an unwed single mother, it showed me how strong I am.  I’m thankful about all of my trials and tribulations because they have made me who I am today.

    Turkey Cranberry Cream Cheese Sandwich3 (cut and wrapped just like at the deli)

    This year take a look back and give thanks to the past that created the now.

    Recipe______________________________________________________

    Turkey Cranberry Cream Cheese Sandwich

    • 3 ounces cream cheese, softened
    • 1 tablespoon whole berry cranberry sauce (more if desired)
    • 4 ounces, sliced turkey
    • 4 slices sandwich bread

    Mix the softened cream cheese and cranberry sauce until well blended.  Spread half of the cream cheese spread onto on slice of bread, layer sliced turkey on top.  Cover with a second slice of bread.


  • Cran-Orange Crescent Rolls-Black & White Wednesday

    November 23, 2011 by Giggles

    BW Cran-Orange Cresent Rolls 5

    This week’s BWW submission “Iced Whisk”.  Susan at The Well Seasoned Cook hosts this weekly culinary black and white photography event.  If you’d like to know more about it you can find out about it here.  I enjoy participating, besides seeing all the beautiful B&W eye candy, there’s zero commitment.  In other words, participate if you like, if you can’t no worries.  Isn’t that nice!

    Cran-Orange Cresent Rolls 1

    More than the actual Thanksgiving meal, I look forward to the leftovers.  I love opening the refrigerator and seeing it over flowing with food.  I love the lazy day following the frenzy of cooking, “you’re hungry? you know where the microwave is.”

    Cran-Orange Cresent Rolls 2

    I also love getting creative with leftovers.  After day two of the identical food that we had on the big T-day, it’s time for me to change things up.  Incorporating leftovers into breakfast is the biggest challenge (if you don’t count eating the leftover pie for breakfast).

    Cran-Orange Cresent Rolls 3

    I actually think that I saw something like this in a Pampered Chef cookbook back in the 90’s, but I can’t remember exactly.  Consider the source,  I’m in my mid-ish 40’s and I can’t remember that I put my glasses on top of my head.

    Cran-Orange Cresent Rolls 4

    Purchased crescent rolls makes quick work of these deliciously creamy stuffed gems.The drizzle of an orange glaze makes you feel like you’re eating dessert for breakfast.

    Cran-Orange Cresent Rolls 5

    Other than using the mixer, the crescent rolls are easy to make and assemble, a great dish for the kids to help make.

    Cran-Orange Cresent Rolls 6

    Sit back and pour yourself a cup of coffee, enjoy the long weekend and the reinvention of leftovers.

    Recipe_______________________________________________________

    Cran-Orange Crescent Rolls

    • 2 (8 ounce) cans Pillsbury Crescent Rolls
    • 1 (8 ounce) package cream cheese, softened
    • 1 orange, juiced and zested
    • 1/4 cup whole berry cranberry sauce
    • 1/2 cup powdered sugar

    Preheat oven to 375°F.  In a medium mixing bowl mix cream cheese, cranberry sauce, 1/2 the orange zest and 2 tablespoons of the orange with a mixer until homogenous and creamy (add more juice if needed), scrapping down the sides as needed.

    Unroll and separate the crescent rolls.  Drop some of the cran-orange filling into the center of the roll by the rounded teaspoon.  Roll up the crescent roll starting with the largest side, then curve gently to form a crescent shape.  Place on a baking sheet.  Bake 11 to 13 minutes or until they are lightly golden.  Let rolls cool slightly.

    Meanwhile prepare the icing.  In a small bowl whisk together the powdered sugar, the orange zest and the orange juice 1 teaspoon at a time until the powdered sugar is dissolved but not too runny.  Drizzle the icing over the cooked rolls.

    Note:  If you are using my Cranberry Orange Sauce, omit the orange zest and orange juice in the cream cheese mixture, replace with milk to make it creamy.


    Click to Print a Recipe Card


  • Venison Sausage and Chestnut Stuffing

    November 22, 2011 by Giggles

    DSC_0172

    “Chestnuts roasting on an open fire, Jack Frost nipping at your nose”  Jack Frost has certainly been nipping at our noses here Montana, actually, I think he’s been biting our noses off.  Our grounds are snow covered and in the last week we’ve had temperatures as low as 7°F.

    “Chestnuts roasting on an open fire”  when I hear that song, it elicits visions of comfort and warmth, a nostalgia over takes me.  I have never roasted chestnuts over an open fire, nor have I ever roasted chestnuts period.  I have felt like I was missing out on something important.  this year, I didn’t want to just elicit that nostalgic feeling I wanted to experience it for real.

    1 DSC_0109

    “Chestnut roasting in a closed oven” (no open fire here)…. I discovered that indeed, I was missing out.  Missing out on peeling the little buggers, talk about difficult.  I followed some instruction I found on the internet…”make an ‘X’ on the nut, roast at 425°F for 15 to 25 minutes, when cool enough to handle peel immediately”.

    1 DSC_0117

    Not sure where I went wrong, the chestnuts were definitely done.  Did I not score a deep enough ‘X’?  Were they roasted incorrectly?  I think both.  After further research I discovered that there should be a little char on the nuts (which I did not have) and the outer covering should curl back making them fairly easy to peel.  I believe a deeper ‘X’ and better roasting would have made a difference.

    1 DSC_0119

    Let’s just say they ended up being a labor of love.  I love my Baby boy and I let him do all the labor!

    1 DSC_0165

    If you’ve never had a chestnut, you are in for a treat.  Chestnuts do not taste nutty as their name would lead you to believe. Rather, they have a more starchy texture with a slightly sweet taste.  I can see why chestnuts are often paired with sausage in stuffing.  The spicy/sweet combo is a great pairing.

    Would I do this again?  Yes, yes I would.  But first I will have to work on the roasting/peeling part, maybe I’ll even try it on an open fire, if Jack Frost doesn’t bite my nose off.

    Recipe____________________________________________________

    Sausage and Chestnut Stuffing

    • 1 package seasoned stuffing cubes (I used Pepperidge Farm)
    • 1 1/2 cups chopped celery
    • 1 cup chopped onions
    • 1 pound venison sausage (or any other bulk sausage of your choice)
    • 1 pound chestnuts, roasted, peeled and chopped
    • 2 cups turkey stock
    • Zest of one orange
    • Salt and pepper to taste
    • 2 tablespoons butter, sliced into pats

    Preheat oven to 350°F.  In a large frying pan over medium high heat, brown the sausage.  Use a wooden spoon to break sausage up into pieces.  Remove meat from the pan with a slotted spoon and set aside.  Drain all but 2 tablespoon of fat from the pan, sauté the onion and celery until the onion is translucent and tender, about 5 minutes.  Add the stock and bring to a boil, remove from heat.

    Put stuffing cubes in a very large bowl.  Add sausage, chopped chestnuts and orange zest.  Pour stock/onion/celery mixture over the stuffing, mix gently.  Add salt and pepper to taste if desired.  Transfer the stuffing to a greased two quart casserole.  Top with pats of butter.  Bake for 30 minutes.


    Click to Print a Recipe Card


  • Frittatine alla Parmigiana-SRC Manu’s Menu

    November 21, 2011 by Giggles

    Frittatine alla Parmigiana_111711_0083

    It’s Secret Recipe Club reveal day.  I am very pleased to announce that I was assigned Manu’s Menu.  Here’s something you probably don’t know, I’ve been a Foodbuzz friend of Manuela’s blog for sometime.  You can imagine my delight when I saw who’s blog I was assigned.  Considering how many blogs I read and the zillions of bookmarked recipes I have, I rarely make a recipe from a fellow blogger. It’s difficult when you are so busy sharing your own recipes to take the time to make someone else’s recipes. But that’s the great thing about SRC, it gives you the opportunity to finally make a dish that you’ve wanted to try.  Besides, Manuela has impeccable taste, evidently we both have the same Villeroy & Boch  Switch 3 patterned dishes.

    Frittatine alla Parmigiana_111711_0075

    Manuela is a naturalized Australian, but she grew up in Milan, Italy and she was raised by Sicilian parents.  Naturally her blog features a lot of Italian food.   Manuela has been posting regional Italian recipes which you can find by index.  For me, I loved that feature.  As an American I have a tendency to classify Italian food simply as “Italian” which is not incorrect, just too generic.  Just like here in America, different regions have different specialties or a different version of the same dish.  For example, no one would call fried chicken, grits and greens a Northern or Western dish and if you read my Clam Chowder post you’ll see regional differences for the same dish.

    Frittatine alla Parmigiana_111711_0007

    Manuela did not specifically list the Frittatine allla Parmigiana to a specific region, rather she shares with us that it’s a traditional Italian dish, a recipe handed down from her Great Grandmother (Sicilian perhaps?).  It’s one of the oldest recipes she has.  Any recipe handed down from a grande nonna is certainly a recipe worth making.  Manuela mentioned that she is amazed at the distortion of Italian dishes, and that she posts the real thing.

    Frittatine alla Parmigiana_111711_0026

    Bloggers inherently have to “lift their leg” and make their own mark on recipes and this one was no different.  I wanted to stay true to the recipe and not distort it but I had a basket full of garlic that I needed to use.  My basket was full of beautiful full heads of garlic, then it broke and garlic went every where.  Most of my perfect heads of garlic split and spread their cloves and skins all over my dining room/kitchen.  What a mess.  One of the best and fastest way to use up garlic is roasting it.  So that’s my mark…Roasted Garlic Frittatine alla Parmigiana.

    Frittatine alla Parmigiana_111711_0062

    Whenever I cook, I keep my handy notebook by my side and make notes.  As I read Manuela’s grande nonna’s recipe, I realized it is like many recipes handed down.  Sometimes ingredients are listed without measurement and sometimes the measurements are a bit ambiguous, such as “1/2 glass milk”.   Since I was unsure of what size of glass it called for I assumed it was a standard drinking glass which is 12 ounces and a half glass is 6 ounce (3/4 cup).  I was spot on in this case.

    Also, I could not find a 13.5 ounce can of tomato puree, only a 29 ounce can.  I doubled the sauce (which is a good thing as you’ll see later), knowing that extra sauce is always a good thing.  I mixed my frittatine batter in a food processor versus a blender, why?  Because I just bought a brand new food processor and this was the FIRST time using it!  It was a huge expense for me, this grander dame of food processors, but I’ve broken two cheaper versions in the last 3 years.  It was on sale and I’m hoping that it will last a loooong time.

    Frittatine alla Parmigiana_111711_0027

    If you decide to use roasted garlic (which was sublimely delicious in the sauce), add the salt to the chopped up roasted garlic cloves and mash them together with the edge of a knife.  The garlic paste will melt into the sauce, adding flavor without anyone biting into a chunk of roasted garlic (not that it would bother me).

    Frittatine alla Parmigiana_111711_0035Frittatine alla Parmigiana_111711_0037

    The frittatine was a definite challenge for me.  I’ve never made crepes or any thing similar so I had no experience regarding the cooking technique.  I was also unsure of the size of pan and what heat setting to use.  My first one came out a bit broken.  I tried to flip it with a turner but it broke.  I determined that I did not have enough butter in my pan to make it nice and slippery.

    Frittatine alla Parmigiana_111711_0043Frittatine alla Parmigiana_111711_0045

    However, the thickness was perfect and I was able to piece it together and hide it under the sauce so no one would know.

    Frittatine alla Parmigiana_111711_0048

    My next attempt, I added more butter and got my layer to slide around nicely, so nicely in fact that I decided to go all chef-y and flip it.  Yeah, not such a good idea (see below).  I use an electric stove top, and I discovered, as my pan really started to heat up, that medium high was too hot.  Note to self: Use medium heat and don’t get all chef-y.

    My dogs were quite happy with the little disaster!

    Frittatine alla Parmigiana_111711_0051

    I added butter to my pan and I made my third second layer, cooked over medium heat and used a turner to flip it.  Ahh perfection.  Only now I was nearly out of batter, I only got four (3 usable) frittatine layers.  I checked Manuela’s pictures and counted the layers, there 8 and I technically only got 4.  I went ahead and made another batch of batter and while it rested for 30 minutes I gave it some thought.

    Frittatine alla Parmigiana_111711_0060

    I knew that my layers were the right thickness but I only got half, that meant the only reason I did not get enough from my batter would be that my pan was too large.  I was using a 10” non-stick pan, the size selected solely on the fact that it “looked right”.  Since I already started with the 10”, and my layering, I needed to continue but I wanted a lovely layered frittatine.  I decided to make thinner bigger layers.  In order to make sure I could get the maximum layers, I measured out the batter for each layer.  I used 1/4 cup for each one, they were thinner but I think if I used an 8” pan the thickness would have been perfect.  I also got exactly 8 layers.  I’m happy to say that I succeeded.

    Frittatine alla Parmigiana_111711_0069

    My frittantine looks like a beautifully layered cake.  I’m glad I made extra sauce because  I ended up with 10 layers.  I over sauced the first few layers, even doing that, I still had sauce left over.

    Frittatine alla Parmigiana_111711_0082

    Is this not one of the most beautiful things you’ve ever seen?  The flavors were incredible, very simple ingredients allowed each one to shine. The tomato flavor explodes in your mouth, followed by some tangy cheesiness and then you are left with a nice roasted garlic and onion flavor to enjoy until your next bite.  The frittatine would be a perfect Sunday brunch dish or for entertaining since it can be enjoyed at room temperature.

    Frittatine alla Parmigiana_111711_0097

    Grazie Manuela per avermi fatto conoscere un’antica ricetta di famiglia, spero che ho fatto tua nonna grande orgoglio!

    The recipe below has my instructions with the halved sauce ingredients (since I had excess), you can see the original here.

    Recipe___________________________________________________

    Frittatine alla Parmigiana

    Frittatine batter

    • 4 eggs
    • 4 tablespoons flour
    • 3/4 cup milk
    • 1/4 teaspoon salt
    • 2 tablespoons unsalted butter divided into 8 slices

    Sauce

    • 1/4 onion, finely chopped
    • 2 tablespoons extra virgin olive oil
    • 1 can (13.5 ounces) tomato puree (no salt added)
    • 1/2 teaspoon salt
    • 1 to 1/2 cups parmigiano reggiano, finely grated
    • 1/2 head roasted garlic (optional), peeled and chopped

    Batter:  Place eggs, flour, milk and salt into a blender or food processor.  Blend until homogenous.  Let rest for 30 minutes.

    Sauce:  Meanwhile, heat olive oil in a medium saucepan over medium heat.  Add onions and sauté until onions are tender, about 5 minutes.  Add tomato puree.  If using the roasted garlic, add salt to garlic and press against a hard surface like a cutting board to create a paste.  Add the salt/garlic paste to the puree.  It not using the garlic add only the salt to the puree.  Bring to a low boil then turn down and simmer for 20 minutes.  Set sauce aside and let cool.

    Frittatine:  Heat an 8”  non-stick frying pan over medium heat.  Add 1/4 teaspoon of butter to pan.  When melted, tilt the pan to coat the entire bottom with butter.  Add 1/4 cup of the batter to the pan, swirl the pan to spread the batter evenly.  Cook until the edges become dry and the surface dries up, then flip. Repeat for each layer making sure to add a little butter in between each one.

    To assemble:  On a large plate or platter, put a little sauce on the bottom, place one layer on top, add more sauce then sprinkle with parmigiano reggiano, repeat until all layers are used.  Top it off with a generous amount of parmigiano reggiano and garnish with parsley or fresh basil.

    Source: Manu’s Menu

    For more SRC reveals check out the hop below:


    Click to Print a Recipe Card


  • Orange Essence Brined Turkey

    November 18, 2011 by Giggles

    1 DSC_0157

    Holy cannoli!  Thanksgiving is less than a week away!  Have you bought your turkey yet?  If you are purchasing a frozen turkey (the most economical kind) then you better get on it.   Turkeys take several days in the refrigerator to defrost.  If you are planning on brining the bird then you need to move up the defrost plan by a whole day.  If you find yourself in a dire situation, there is the water method of defrosting.  It’s done by soaking the frozen turkey in cold water and changing out the water every 30 minutes.  Hey, that is what bathtubs are for, right? Yeah, I’ve been there done that, I’d rather plan a little better and let the defrosting happen on it’s own in the fridge.

    If you haven’t picked up on my theme for this year by reading my posts for Cranberry Orange Sauce and Sweet Potato Casserole, I guess I’ll have to clue you in.  Every year I pick a theme and put a twist on the traditional dishes.  Sometimes the themes are centered around a specific ingredient like oranges, cranberries or sage.  Sometimes I take my cue from a locale like Mediterranean (one of my favorites to date), Southern, etc. or a mood I’d like to set, elegant, or maybe homey.  By setting a theme it gives me an anchor, a common thread throughout my dishes.  The palate likes cohesion whether your aware of it or not.

    I always serve the traditional turkey, stuffing, mashed potatoes, gravy, green bean casserole, etc.  But I just can’t help myself, I’ve got to put a little  different spin on the traditional food every year.  Ready for this….this years star is the orange, it’s the Baby boy’s favorite citrus and I thought it a suitable Thanksgiving theme!  Don’t worry, I’m not going to go to over the top, the idea is not to make everything taste like orange…just to allude to it. Note:  I saved my squeezed (and sometimes zested) orange halves for the brine from my other recipes.

    When brining a turkey, it’s essential to keep it cold…don’t want to make grandma sick!  I like to brine mine in a large zipper lock bag, only because I hate washing up.  It is perfectly acceptable to use a 5 gallon bucket or a cooler.  It may be necessary if you don’t have the refrigerator space.

    I actually keep my bagged brining bird in a cooler in the garage.  I have to store it in the cooler to keep it from freezing…not to keep it cold, crazy Montanans!

    1 DSC_01271 DSC_01451 DSC_01521 DSC_0147

    I’ve adapted the recipe from Alton Brown, the brined was changed and part of the cooking method is one I prefer.  I like to start with the breast side down and then flip to ensure a tender moist breast with a beautifully crisp skin.   The brine flavors the turkey wonderfully with just an essence of orange…that anchor that is my theme for this year.  I apologize for not having a picture of the lovely whole bird, I guess I got a little to excited and dug into the slicing before capturing the big beauty.

    1 DSC_0173

    Recipe_________________________________________________

    Orange Essence Brined Turkey

    • 1 14 to 16 pound turkey, giblets removed
    • Canola Oil
    • Salt & Pepper

    Brine

    • 1 cup Kosher Salt
    • 2 boxes (32 ounces) turkey stock
    • 1 gallon apple cider
    • 2 oranges, halved
    • 1 1/2 teaspoon allspice
    • 1 tablespoon peppercorn

    Aromatics

    • 1 onion, quartered
    • 1 orange, halved
    • 6 sage leaves
    • 2 sprigs rosemary
    • 4 sprigs thyme
    • 1 cup water

    In a large pot, bring to boil the salt, stock, apple cider, halved oranges, allspice and peppercorns.  boil and stir until all the salt is dissolved, let cool completely.  This can be done up to two days ahead.

    Day before cooking turkey, place the brine and turkey into a large sealable bag, (a 5 gallon bucket or appropriately sized cooler can be used).  Brine bird for 8 to 16 hours in a cold location (refrigerator, cooler with ice, garage, outside, etc.)  Turn bird half way through.

    Day of, plan 3 hours for a 16 pound turkey to cook and rest.   Preheat oven to 500°F.  Remove bird from brine and rinse. Pat dry with paper towels.  Place onion, orange halves, sage, rosemary, thyme and water in a microwave safe bowl.  Microwave aromatics for 5 minutes, drain and stuff aromatics into the cavity of the turkey.  Brush turkey with canola oil and liberally salt and pepper.

    Place turkey on a roasting rack in a roaster breast side down,  roast on the lowest rack in the oven for 30 minutes.  Turn the oven down to 350°F, carefully turn the bird over so the breast is up and continue to roast for another two hours or until the internal temperature reaches 160°F.  Remove turkey from oven and let rest 20 to 30 minutes before carving.

    Note:  If the turkey starts to brown too much, tent it with foil for the remainder of the time.


    Click to Print a Recipe Card


  • Redneck Breakfast on a Croissant

    November 17, 2011 by Giggles

    Redneck Breakfast on a Croissant_111611_0015

    It’s no secret, I have a split personality.  I don’t mean like Dr. Jekyl and Mr. Hyde, it’s more of redneck/white trash versus socially refined, kind of way.  In other words, you can take the girl out of the trailer park but you can’t take the trailer park out of the girl.

    I don’t live in a trailer park any more, no more Section 8 housing, no standing in line for free government cheese.  Now I can afford to buy good food and even spring for some pricy items like truffles or lobster if I want too.  But something about your roots, they just pull you in.  Taking you back to another time, another palate.  One, that frankly, I still enjoy (read my bio and you’ll see it’s true).

    There are some of you who wouldn’t touch this sandwich with a ten foot pole, but I’m telling you, try and embrace the redneck that’s somewhere deep inside of you.  If you can’t seem to find any low budget trashiness inside of you, imagine this sandwich is a star feature of Guy Fieri’s Diner’s, Drive-ins and Dives.  Because this is exactly the kind of ‘dive’ food that people can’t get enough of.  This sandwich was ridiculously good!  You can pretend it’s the “in” thing.

    This sandwich kind of represents both sides of me, a perfect mix of good ingredients and naughty ingredients.  It starts with a beautiful croissant, toasted.  Between it’s buttery and flaky layers is some crisply fried canned corned beef hash, topped by a perfectly cooked over easy egg sprinkled with kosher salt and freshly cracked black pepper then topped off by canned sharp Cheddar Cheese.

    Perhaps I was just channeling “Chopped” and my ingredient basket contained: croissants, eggs, canned corned beef and canned cheese.  How will I impress the judges? Believable, no?  Of course I actually purchased the items, paid hard earned money for them, which means they are stocked pantry items…no way to cover it up, I like canned cheese and canned corned beef hash.

    I have a confession, sometimes I like to squeeze the canned cheese directly into my mouth.  Forget the crackers, my taste buds need to be instantly infused with the salty, creamy, cheesy, fake orange goo.  If I’m trying to be good I’ll squeeze a little on my fingers, mmm, mmm, finger lickin’ good.  Then when the can starts to sputter, pushing the last bit of cheesiness out, I put the nozzle in my mouth, clamp my lips down tight on it and suck…just like a straw (and if you were thinking anything else, shame on you).  I suck out that last little bit that sticks in the nozzle…just too good and too naughty to waste.

    BTW, I know I’m not the only one.  I’m speaking to you, lady, from the party last Friday night.  There, it’s out in the open, my secret love affair with canned cheese.  Do any of you have a naughty taste for trashy food?

    Recipe_________________________________________________

    Redneck Sandwich on a Croissant

    For 1 Sandwich:

    • 1 croissant
    • 1/4 cup canned corned beef hash
    • 1 egg
    • 1/2 teaspoon butter
    • Kosher salt and freshly ground black pepper

    Split the croissant in half and toast.  Heat a non stick pan over medium high heat, add the corned beef hash.  Cook the has until it is brown and crisp on one side (3 to 5 minutes), then flip with a turner and cook the other side until it is crisps and browns, another 3 to 5 minutes.  Note: While cooking the has push it together and flatten it so it makes a little patty, it’s much easier to flip and serve that way.  Place the corned beef hash patty on the bottom half of the toasted croissant.

    In the same pan, melt the butter and add the egg, fry according to taste.  Sprinkle the egg with a little salt and pepper and place on top of the corned beef hash patty.  On the top side of the croissant, squeeze a layer of canned cheese over it.  Place the top layer over the bottom half.  Serve immediately.


    Click to Print a Recipe Card


  • ©2010 The Kitchen Witch Blog - All Rights Reserved
    Website Designed and Developed by Shortgrass Web Development